Wednesday, 15 January 2014

Design Principles: Colour Theory - part 2

CHROMATIC VALUE

HUE
+
TONE (LUMINANCE)
+
SATURATION

Chromatic value is describing a certain colour. Each colour is made up of different elements that make it look a certain way. Hue, tone and saturation all come together to make a certain colour.

The contrasts below are all elements of each colour, too.

Contrast of TONE
Contrast of HUE
Contrast of SATURATION
Contrast of EXTENSION
Contrast of TEMPERATURE
COMPLEMENTARY contrast
SIMULTANEOUS contrast

Contrast of TONE
It is formed by the juxtaposition of light and dark values. This could be monochromatic.


Tone deeply affects how type is perceived. The higher the contrast, the more readable the word is against the background.


Above, the word is too similar in tone to the background, so it isn't as clear. The black word is the most readable against the grey, because they are opposites on the colour wheel, so they compliment eachother with a nice balance of contrast that isn't too high or too low.


Coming back to colour, the same still applies.


Orange is too near red on the colour wheel, so they clash, making reading the word difficult and quite unpleasant.


The word definitely stands out, but too much, making the blue pop out in a very extreme, unpleasant way. The right balance for a red background would be a green colour.

Contrast of HUE
Formed by the juxtaposing of different hues. The greater the distance between hues on a colour wheel, the greater the contrast.

Its quite hard to distinguish between the colours when the bright white is in the background, as the contrast is so high.


The black makes the colours easier and more pleasant to look at as the darkness works well with the brightness of the blue, yellow and red.
Having no space in between the colours makes for a more pleasant experience, as the contrast has been toned down and there is less to focus on.

The yellow word is the hardest to read because it is too light in hue against the white. The blue reads best as the contrast is highest.


It is the opposite on the black background; yellow is the most readable.


Yellow is the most readable on a red background.


The blue word is the most readable, which is surprising because it is on a blue background but it shows that high contrast isn't always suitable.


Contrast of SATURATION

Formed by the juxtaposition of light and dark values and their relative saturations.


Contrast of EXTENSION

Formed by assigning proportional field sizes in relation to the visual weight of a colour. Also known as the contrast of proportion.
Lighter colours are usually used more than darker colours are when used together.


Contrast of TEMPERATURE

Formed by juxtaposing hues that can be considered 'warm' or 'cool'.
These colours are all extremely similar when put next to each other, but when separated are completely different. Our eyes adapt to the colours and changed how we see them; we create a gradient that helps us determine between different colours that are touching. It can be seen below with and without separators:


Complementary CONTRAST

Formed by juxtaposing complementary colours from a colour wheel or perceptual opposites


Simultaneous Contrast

Formed when boundaries between colours perceptually vibrate.


Tuesday, 14 January 2014

Studio Brief 4: Ideas


I quite like the idea of promoting an exhibition of album artwork.
  • specific era/decade
  • seperate decades
  • 60s - present time
  • illustrations of famous covers on promo posters
  • different posters for different target audiences - old albums and new ones

Monday, 13 January 2014

Studio Brief 4: concept ideas

For this brief, I need to rewrite the brief and make something that solves a problem based around my research. What I create needs to be something that is missing.


Research: audio formats and album artwork.

Possible ideas:
  • promotion material for an art exhibition of album artwork through the ages, to rekindle the passion for them as works of art.
  • redesign bad album covers that have recently been released, to show the decline in thought and love put into them.
  • booklet explaining why vinyls are a novelty and why more people should appreciate them and keep them going.

Wednesday, 8 January 2014

Design principles: Colour Theory - colour task


Over the christmas break everybody collected between 15-20 items of a certain colour. All my items were green. Our task was to arrange our colours so that a colour wheel would be created around the studio.


This task was deemed pretty tricky, as each object had a different hue, saturation and tone. Some objects were transparent, which confused our perception of colour this early on in learning about colour theory. Transparency affects the tint of a colour, but not the hue, so it was tricky to know where to place objects with high transparency levels. 
Some objects had a shiny surface which reflected light more than other objects, which affects the saturation.
I was working in a small group to order the greens, and we focused on a mixture of all the elements of colour, as we weren't aware of the complexity at this point. We had to order the colours so that they would subtly change from yellow to green to blue, so we worked with mostly hue but the darker greens were placed near the blue, which is relying on the tone.


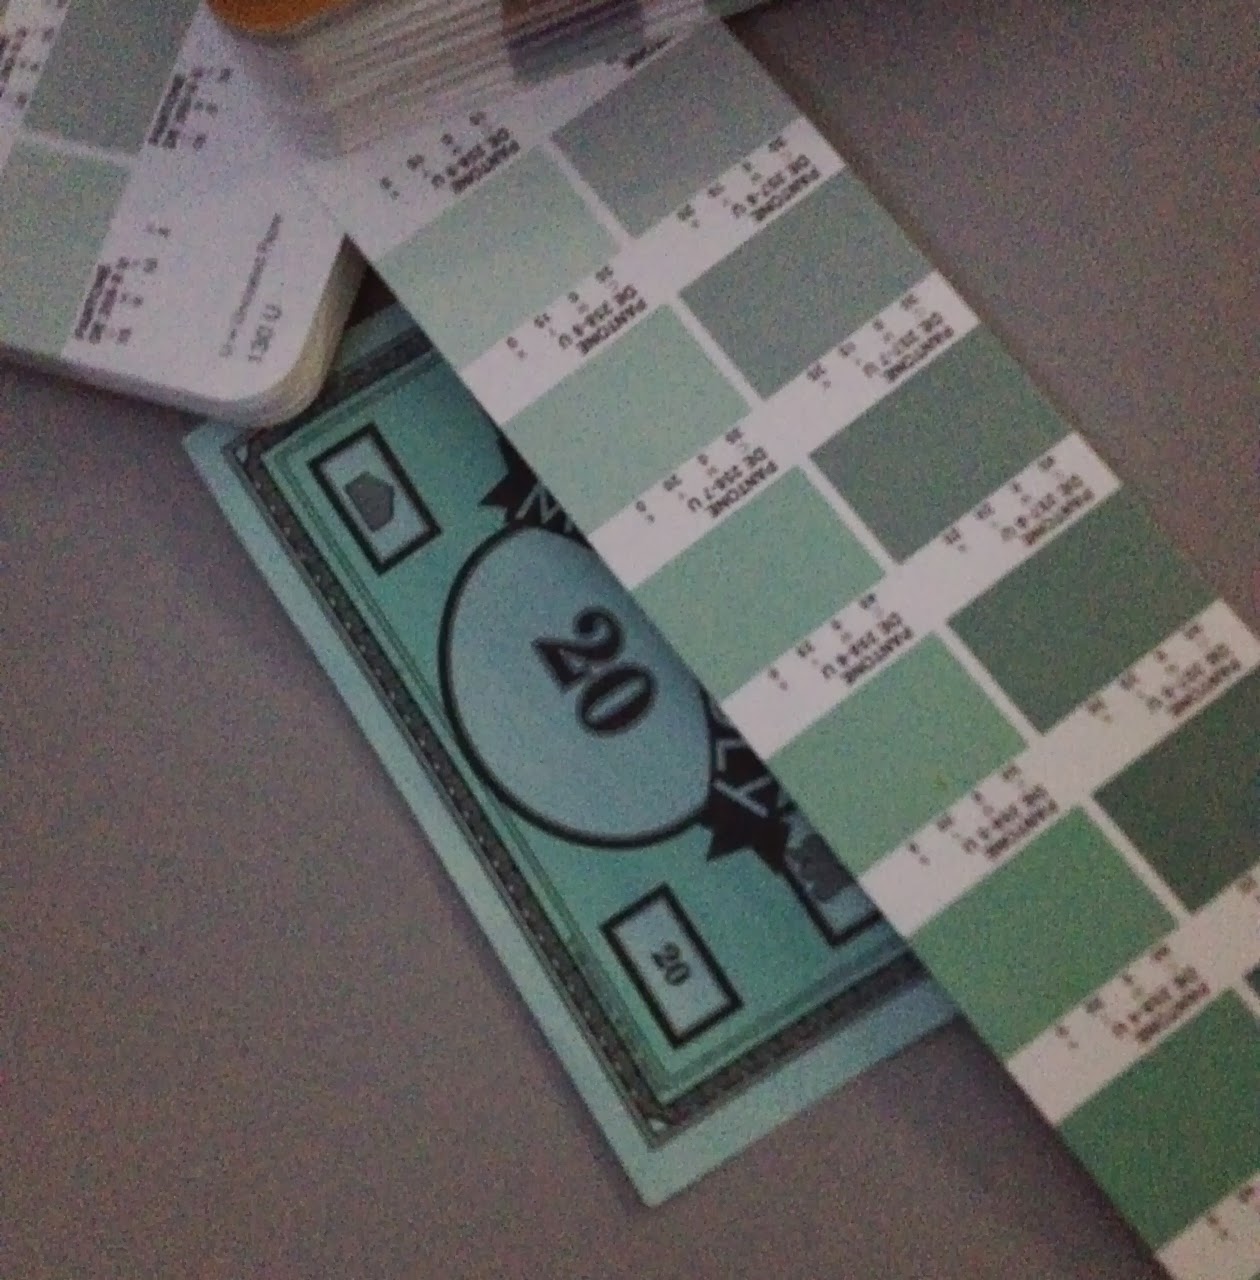
Pantone matching 5 objects


Book cover:
with lights on - 381U (solid uncoated)
with lights off - DE302-3U (solid uncoated)


Monopoly money:
lights on - DE25-8U (uncoated)
lights off - 317U (solid uncoated)


After Eights box
lights on - 5533C (solid coated)
lights off - 5533C (solid coated)


Tupperware lid:
lights on - 361C (solid coated)
lights off - 361C (solid coated)


Aerosol lid:
lights on - 358C (solid coated)
lights off - 358C (solid coated)

The task of pantone matching was relatively easy with some of the colours, for example the book cover and the After Eights box were the easiest because the colours have been printed on to card. The aerosol lid was very tricky because of it being plastic, which most of the time has a slight transparency; it would be impossible to find a printed pantone colour that had the same tone.
We got 2 out of 5 matchings right when we turned off the lights. Getting the same match for the aerosol lid was surprising, because of how much light passes through it. However, getting the book cover and the monopoly money wrong was expected because of the bright hue of the green (which catches the light) and the paleness of the blue (darkness would affect it easily).

Design Principles: Colour theory part 1


AN INTRODUCTION TO COLOUR THEORY


The range of colours the human eye can see
In this lesson we were introduced to colour theory. I learnt a lot about how we perceive colour, and how we can all see colour very differently depending on how our eyes work. 25% of the world's population is colour blind. 
Colour is actually much more important in graphic design than I thought, especially typography. It effects how legible and readible letters and words are. The type below is incredibly illegible and hurts to look at because of the clash of similar colours.


But when the same type is put on a white background, it suddenly becomes very calming and easy to look at and read.
However, it still isn't as legible as you would like, as the lilac colour is very pale. 


The text above is even more legible, but very bright and not completely pleasant to read, so the readability isn't at the same level as the legibility. 

These combination of colours are the most satisfying to read in terms of legibility and readability. The image below is incredibly hard to look at because the level of contrast is too high.


These combinations of colours have different effects because of how our eye and brain perceives them. The colour may be changed along the way. As seen above, there are three stages:
  • physical - the literal colour of an object
  • physiological - how our eye picks up the colour
  • psychological - how our brain perceives what our eye has seen
This is how many people handle colour in different ways. 


The eye contains two kinds of receptors:
Rods convey shades of black and grey
Cones allow the brain to perceive colour

There are three different types of cones:
Type 1: sensitive to red-orange light
Type 2: sensitive to green light
Type 3: sensitive to blue-violet light

When the green cones are stimulated, we see green.
When the red-orange cones are stimulated, we see red.
When both the green and red-orange cones are simultaneously stimulated, our perception is yellow.

Because of this physiological response, the eye can be fooled into seeing the full range of visible colours through the proportionate adjustment of just three colours: red, green and blue.


As seen above, many people suffer from different cases of colour deficiencies. This can completely change the colours they perceive. Because of this, graphic designers have to be aware of how some people may perceive their designs in the completely wrong way. 


Josef Albers (1888 - 1976) and Johannes Itten (1888 - 1967)
These men were both early colour theorists. 

Johannes Itten's colour wheel 

From this colour wheel you can see which colours compliment each other, depending on if they are opposite each other on the colour wheel. For example, violet and yellow compliment each other. These same colours also cancel eachother out when mixed together:


Above is a tertiary wheel. It shows the neutral versions of the colours on the original colour wheel.

Spectral colour: a colour that is evoked by a single wavelength of light in the visible spectrum or by a relatively narrow band of wavelengths.

The eye cannot differentiate between spectral yellow, and some combination of red and green.
The same effect accounts for our perception of cyan, magenta, and the other in-between spectral colours. 

RGB/CMYK colour modes


When CMYK colours overlap they show the secondary colours for RGB. When the RGB colours overlap, the result is the CMY colours.

Additive colour: colour created by mixing light of two or more different colours. Red, green and blue are the additive primary colours that are normally used in additive colour systems. The light that is added is reflected off a surface or will be picked up by the viewer's eyes eg when looking at a computer screen.

Subtractive colour: colours are created by subtracting parts of the spectrum of light present in ordinary white light, by means of coloured pigments or dyes (such as those in paints or colour photographs on film). This is why it is ideal for printing.

DIMENSIONS OF COLOUR

Chromatic value = Hue + Tone + Saturation


HUE:


LUMINANCE:

Shade, tone and tint


Colours are classed as certain colours depending on what OTHER colours they are next to.


Pantone colours are very systematic and are a very successful guide when choosing which colours to use in graphic design.


Tuesday, 7 January 2014

Studio Brief 3: Layout ideas

  • black background, white text - I think the only problem with using a black background for a spread is that the printers in the studio don't print black well at all and fitting in a session at the digital print resource will be too hard.
  • use curves or circles to represent vinyl/CDs - I want to create conceptual designs in my layouts, while staying subtle, so the idea of using curves or circles seems pretty plausible, however I do like boxes and sharp edges so I don't know how often I would want to use this kind of feature.
  • photo background - this is a feature I've seen used before and I think its really effective and looks great. It creates a visual context for the content.
  • 4 photos on each spread - it is quite known that some people lose interest when there is nothing interesting to look at on a page, so using photographs each time to brighten it up would be a good idea.
  • use vectors of line images of vinyl/CD/tape - I want to possibly use some illustrations based on audio formats, if I have time to draw them, to make the layouts more 

I want to spread out my information across the 5 spreads, rather than have them separated and given a spread each. This is because from looking at other booklets etc this is what normally happens with page layouts. I think that one entire page of 20 statistics would be too much for the reader to take in.
I also want to use less than 100 things, however I may be able to fit them all in in the end. I just don't want to focus on squeezing in lots of information more than my actual designs.

Layout idea 1 
Across the double spread:

  • 3 facts
  • 4 photos
  • 1 statistic


Layout idea 2
Across the double spread:

  • 20 opinions - album covers

Layout idea 3
Across the double spread:

  • One photograph as the background
  • 5 statistics

Layout idea 5
Across the double spread:
  • 4 statistics
  • some sort of line image of earphones, maybe white on a blue block colour
  • 4 photos
  • words from my 20 words


I've thought of the idea of having music notes across all the spreads at the top and bottom, possibly. I'm not confident with this idea yet as I want to try it out on indesign to see how it'd look properly. However I think it would add a nice conceptual touch to it, and a clear theme throughout.
    Text on left in three uneven columns, with a large statistic of fact on the right page taking up all the space. I like this idea of unevenness between the pages, on one side there is small body font and then big typography on the other side. I've seen this in some of my research and it certainly drew me (the viewer) in.


Monday, 6 January 2014

Type Journal: The Mighty Boosh on tour


Found on the design of a Mighty Boosh DVD. Sans serif, block font; there is barely any negative space in and around the letters. Has an animal/wildlife feel to it which makes it seem playful and suits the context.

Friday, 3 January 2014

Type Journal: Cluedo board game


I would expect the typeface used for Cluedo to be more formal or serif because of the nature of the game, but it is sans serif and like this to make it appealing to children.

Thursday, 2 January 2014

Type Journal: Disney logo


I found this on the side of a Trivial Pursuit Disney board game. It is an extremely recognisable logo, particularly because of the 'D' at the start which has a very distinctive design. The looping of it makes it look like a 'G' in my opinion, which makes it not as successful as you may think.
It is very playful and childish because of Disney's audience, and it is a Disney font.